
SG-HC100 Troubleshooting
If you’re having trouble with your SG-HC100 1080P HD Self Recording Non-WiFi Pinhole Hidden Camera, the following troubleshooting tips should help resolve any issues you encounter.
The most common issue users may encounter is that the device is not recording, or that the files didn’t save properly. The tips below can help address that:
Table of Contents
1 . Proper Micro SD Card Size and Formatting
The very first thing to check is that you’re using the proper type and size memory card. If you purchased a memory card from us, this likely isn’t the issue, as we only sell memory cards that we’ve tested to ensure compatibility.
If you didn’t get your memory card from us, or are using an older memory card you had laying around, this is the first thing to check. First, make sure that the memory card is a name brand, high speed memory card suitable for recording HD video.
Memory card brands like Samsung and Sandisk are our recommended choices, however some other brands may work.
Make sure that the memory card is 8GB, 16GB, 32GB, or 64GB in size. Smaller or larger size cards are not compatible with the HC100 camera, and will not allow videos to be recorded properly.
Next, if you’re using an existing memory card, make sure that it is formatted properly for use in one of these types of devices. The proper format is FAT32. You can verify that your memory card is formatted to the right file system by right clicking on the memory card in your My Computer window, and clicking “Properties”. You should see the file system say FAT32, like in the image below:
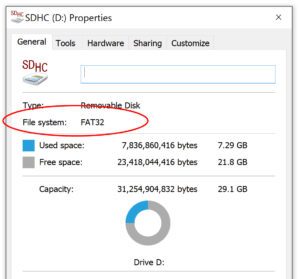
If the file system says something else, like EXFAT or NTFS, you’ll need to reformat the memory card to use FAT32.
To reformat the card, which will erase everything on the card and change the file system to FAT32, right click on the micro SD card icon in your My Computer, click Format, under the file system select FAT32, then click Start.
The reformat process should take only a few seconds, and then once complete, the card will be erased, empty, and properly formatted.
2 . Check the Camera Power
After you’ve made sure you’re using the right card, the next thing to check is that the camera is getting power. The camera can be either battery powered or AC powered. We recommend using AC power the first time you use the camera just so you can get a feel for how the camera works. This will also give you time to charge the battery.
To use AC power, plug small end of the USB plug into the camera’s power port, and the other end into the USB wall charger. Then plug the wall charger into any standard wall outlet, surge protector, or extension cord.
Make sure you’ve got the memory card fully inserted and snapped into place.
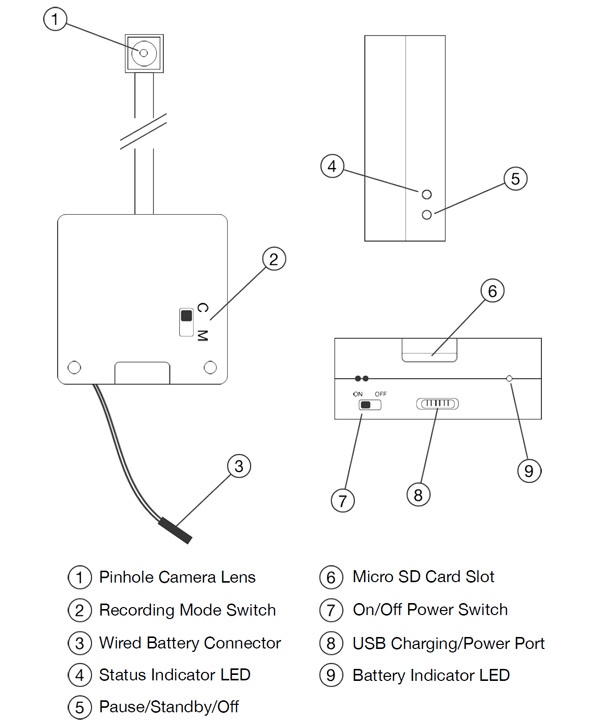
Slide the power switch to the ON position, and you should see the LEDs on the device start to turn on. There is a battery indicator LED, as well as a status LED:
Once you’ve turned the camera on, if you see the status LED flash 10 times and go out, there is a problem with the memory card, so see #1 above for memory card troubleshooting.
While the device is connected to AC power and the battery pack is connected, you’ll see the battery indicator LED shine solid green while charging, and go out once fully charged.
3. Let Camera Record for 10-15 Minutes
If you’re trying to record video and the files do not play back or open, or you see that the file size says 0bytes, then the file didn’t save properly.
The most common reason for this is because the device was turned off in the middle of recording a file, causing it to not save properly. If you record for a long time, this only affects the very last file (the one that was being recorded when you turned the camera off). All the other video files should play fine.
To test this out, since the video files are 3 minutes long by default, we recommend turning on the camera, putting it in continuous recording mode, and let the camera record for 10-15 minutes. This will give the device a chance to record through several 3 minute video files.
When you turn the camera off, you should see several files recorded. The last file might not save properly when you turned the camera off, but all the other files should play correctly.
4. Make Sure You Are Using VLC Media Player for Playback
If your video files are playing back with no picture, or not at all, another cause might be an out of date video player. This often happens if your computer is older, or video drivers are out of date.
We recommend downloading and using VLC Media Player to play back video files from this device as well as any of our other hidden cameras.
To download VLC, head over to their website:
5. Additional Tips
If you’ve gone through the above steps and are still having trouble recording or watching playback, a few additional tips:
- Turn the device off and back on
- Fully disconnect the battery and reconnect
- Switch recording mode to continuous
- Use a different memory card, or buy one from us
6. Contact Our Support Team
If you’re still having difficulty and you’ve gone through all the troubleshooting tips above, please contact our support team and we’ll be glad to further assist you!